2. Deploying Exchange Certificates
Now that we've
talked about certificates in general, let's dive into the issues of
getting them deployed on your Exchange 2010 servers.
2.1. Planning Certificate Names
The first part of
creating digital certificates for your Exchange 2010 servers is deciding
on which names you need. For a Client Access server, it's highly
recommended that you accept the need for a SAN certificate. Although SAN
certificates are more expensive than single-name certificates, you can
often configure them so that you can reuse them on multiple servers.
Otherwise, you need to use a lot of single-name certificates—possibly
with multiple websites and virtual directories on your CAS instances.
And since HTTPS requires a dedicated IP address for each hostname, this
can become an overwhelming amount of operational overhead.
Sure, you can use
wildcard certificates for some scenarios such as Outlook and Windows
Mobile 6.0 and later. The wildcard certificate is a certificate that is
issued for an entire domain, such as *.somorita.com.
This certificate could then be used by multiple servers and sites.
Naturally, wildcard certificates are usually more expensive than
certificates issued for a single host. Be aware, also, that not all
clients (such as Windows Mobile 5 and earlier) will recognize wildcard
certificates.
Let's take the three-site somorita.com example and some of the factors to consider when requesting certificates:
We've already
established that we don't want Seattle clients using New Orleans Client
Access servers and vice versa, so for Internet connectivity, the Toledo
site makes sense as the gateway to the Internet. This will need the
domain name autodiscover.somorita.com.
We'll use the domain name mail.somorita.com as our generic external access domain name. We don't need to use a separate domain name for this—we could easily use autodiscover.somorita.com, but users are accustomed to an easier-to-understand domain name.
Having
two domain names means either multiple IP addresses and websites or a
SAN certificate. We don't want to incur the overhead of multiple
certificates and websites, so we will use a SAN certificate; we can
issue a single certificate for all the Client Access servers in the
Toledo site. We'll include the FQDNs of each of the servers, bringing
our total number of names to four. Most commercial CAs have a price
increase after five domain names on a SAN certificate, so we're within
our limit. But always consider all the places you may want to use a
certificate such as on Hub Transport servers for SMTP.
Our certificate will therefore need four domain names: mail.somorita.com, autodiscover.somorita.com, tol-cas01.toledo.somorita.com, and tol-cas02.toledo.somorita.com.
We don't need to include the NetBIOS names of our servers—Exchange and
its clients don't use them unless we choose to configure them otherwise.
It is important to note as you
start requesting certificates that poor namespace planning or separate
internal namespaces (such as somorita.com for external clients but somorita.local
for internal clients) will result in more complex certificate
requirements. If possible, ensure that you have carefully thought out
the internal and external URL requirements as you are planning your
Exchange Server 2010 deployment.
2.2. Issuing and Enabling Certificates with EMC
In Exchange 2007, you had to do
all your certificate requests and imports either through the Certificate
MMC snap-in (which was a pain) or through the EMS. In Exchange 2010, if
you click on the Server Configuration node in the EMC, you can view,
manage, and even request new certificates for your Exchange 2010
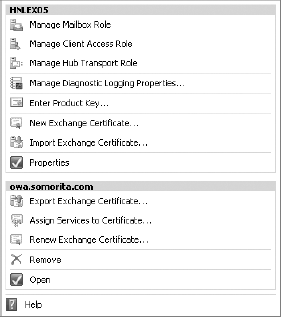
servers. Figure 4
shows the tasks that are available in the Actions pane for the server
HNLEX05 (selected in the Results pane) as well as for a specific
certificate that is selected in the Work pane).
Note that you cannot use this
tool to handle certificates for any Exchange 2007 servers you may have
in your organization; certificate handling typically must be done on the
server. This interface is the only Windows-based certificate management
tool we have seen that allows creation and management of certificates
on remote Exchange Server 2010 servers—all thanks to the magic of Remote
PowerShell. To create a new certificate, you use the New Exchange
Certificate wizard; when you launch this wizard, you will first be asked
on the Introduction page for a friendly name for the certificate. While
this name can be anything, we recommend you name it something that
describes the use of the certificate.
On the Domain Scope page of
the wizard, you need to specify the scope of the certificate, such as if
it should be enabled for all subdomains. This is sometimes called a
wildcard certificate; your certificate issuer must support wild card
certificates. Wild card certificates can be considerably more expensive
than single-name certificates.
On the Exchange Configuration
page of the wizard, you will see the different types of services that
you can enable for a certificate (such as OWA, ActiveSync, SMTP, etc.)
From this page of the wizard, you can enter the names as fully qualified
domain names of the services.
Note in Figure 5 that this server's internal OWA name is hnlex05.volcanosurfboards.com and the external name is owa.somorita.com.
For some of these fields, the New Exchange Certificate wizard is making
a "best guess" at the correct names, but you will need to fill in some
of the others manually. The fields that are populated on the Exchange
Configuration page are the ones that will appear in the certificates
subject alternate name field.
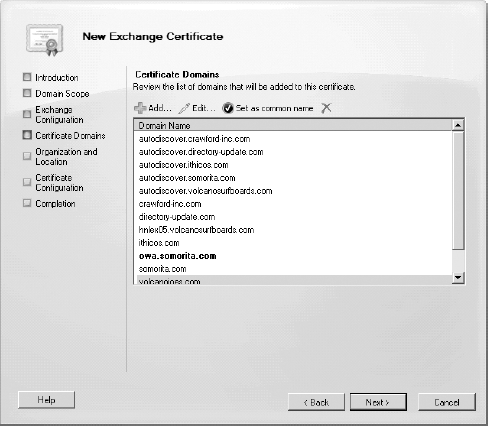
In Figure 6,
you can see the Certificate Domains page; this page allows you to
specify additional fully qualified domain names that will show up in the
certificate request. The wizard is making another "best guess" for this
certificate request by adding all of the accepted domains as well as
adding the host name autodiscover to each of these domain names.

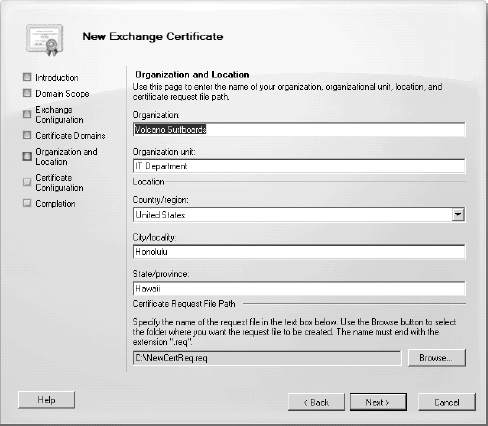
The Organization and Location page of the wizard (shown in Figure 7)
is requesting information that most administrators who have configured a
certificate request before will recognize. This includes the
organization information, department, city, state, and country. At the
bottom of the Organization and Location page you must provide a name and
path where the certificate request file will be created.
The Certificate
Configuration page allows you to review the information about the
certificate request that you are generating prior to actually creating
the request. Once you are sure that the certificate request is correct,
you can click the New button to actually generate the request and store
it in the certificate request file.
Like all EMC wizards,
the Completion page of the wizard will include the actual EMS command
that was executed in order to generate the certificate request. Here is
the EMS command that was generated for this particular example:
New-ExchangeCertificate -FriendlyName 'smtp.somorita.com'
-GenerateRequest -PrivateKeyExportable $true -KeySize '2048'
-SubjectName 'C=US,S="Hawaii",L="Honolulu",O="Volcano
Surfboards",OU="IT Department",CN=owa.somorita.com'
-DomainName 'hnlex05.volcanosurfboards.com',
'owa.somorita.com','somorita.com',
'autodiscover.volcanosurfboards.com',
'autodiscover.directory-update.com',
'autodiscover.somorita.com',
'autodiscover.ithicos.com',
'autodiscover.crawford-inc.com','volcanosurfboards.com',
'directory-update.com','volcanojoes.com',
'ithicos.com','crawford-inc.com' -Server 'HNLEX05'
You can now take the contents
of the file that was created and submit it to a certificate authority to
issue the certificate. Once you have received back a signed
certificate, you use the Complete Pending Request wizard to complete the
process. This wizard will load the signed certificate in to the
certificate store on the appropriate server.
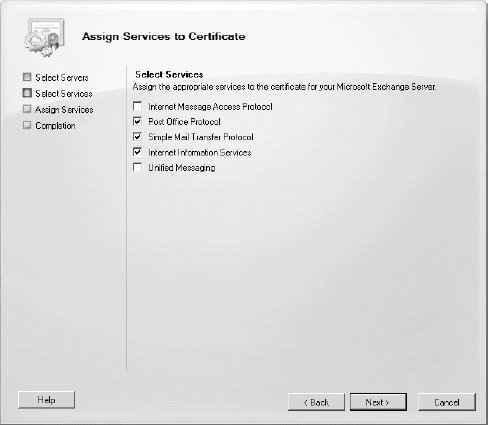
The final process after the
certificate is fully loaded is to assign the certificate to be used by
the appropriate services (such as SMTP or IIS). Select the certificate
in the work pane and then select the Assign Services to Certificate
wizard. On the Select Services page of the wizard (shown in Figure 8)
select the appropriate services. When you select Internet Information
Services, that includes OWA, the Exchange Control Panel (ECP), Exchange
Web Services (EWS), and ActiveSync. Note that a service can only be
assigned to one certificate at a time.
The only other note of
caution we give you is that whichever tool you use to request
certificates should be the tool you use to import them. Although you
should be able to mix and match them in theory, we've seen odd results.
Also, don't use the certificate wizard in IIS to request Exchange
certificates, especially if you need SAN certificates.
2.3. Issuing and Enabling Certificates with EMS
Although Exchange
2010 provides an Exchange Management Console interface for managing
certificates, you can still manage certificates in Exchange 2010 (and
2007) through the EMS. If you have done this in the past with Exchange
Server 2007, you will have to learn a few new tricks in order to work
with certificates from the EMS. Due to the remote PowerShell, you can no
longer specify a path for certificate request file. Instead, the
certificate request is output to the shell, so you must capture that to a
variable. Here's the command you would issue to generate a certificate
request for the URL mail.somorita.com and capture it to the $Data variable:
$Data = New-ExchangeCertificate -GenerateRequest -SubjectName "c=US,
o=Somorita Surfboards, cn=mail.somorita.com" -DomainName somorita.com
–PrivateKeyExportable $true
Next we need to take the value stored in the $Data variable and output that to the file c:\CertRequest.req using this command:
Set-Content -path "C:\Docs\MyCertRequest.req" -Value $Data
Here are the details of the New-ExchangeCertificate cmdlet command:
GenerateRequest
This parameter tells
Exchange to generate a certificate request. Had we left it off, the
command would have generated a new self-signed certificate. That's
usually not what you want. This request is suitable for either an
internal PKI or a commercial CA.
PrivateKeyExportable
This parameter is
extremely important and is the cause of most certificate headaches we've
seen. When a certificate request is generated, it includes the public
key, but the private key stays in the secure Windows certificate store.
If the CA is configured to allow export of the private key, the request
must explicitly ask for the private to be exportable. If this parameter
wasn't included or was set to $false,
we wouldn't be able to export the certificate's private key to import to
the other Toledo CAS instance, or on to the external firewall.
FriendlyName
This parameter is set for
administrative convenience. If we have multiple certificates issued to
the machine, it allows us to identify which certificate we're dealing
with.
DomainName
This parameter allows us to
set one or more domain names. If we specify more than one, Exchange will
automatically create and populate the SAN property with all the
requested hostnames and set the subject name of the certificate to the
first hostname in the list. Although the cmdlet provides additional
parameters to explicitly set the subject and alternate names, you don't need them.
A successful run of the
cmdlet will generate the request output and a thumbprint of the request.
Submit the request to your CA, download the corresponding certificate,
and then import the certificate back on the same machine:
Import-ExchangeCertificate -FileData $(Get-Content
-Path c:\ \CertImport.pfx -Encoding byte)
-Password:(Get-Credential).password
This cmdlet will import the
saved certificate if it matches a pending request, and print out the
thumbprint of the newly imported certificate. You can now view the
certificate in MMC or from the certificate management functionality in
the Exchange Server 2010 Management Console.
The final step is to enable Exchange services against the certificate:
Enable-ExchangeCertificate -Thumbprint <certificate thumbprint>
-Services <services>
<services>
is a comma-separated list of one or more of the following values,
depending on the protocols you have enabled and the roles you have
installed:
SMTP
For use with SMTP + TLS on Hub Transport and Edge Transport servers
UM
For use with Unified Messaging servers
IIS
For use with Client Access servers, including Autodiscover
IMAP
For use with Client Access servers that are serving the IMAP client protocol
POP
For use with Client Access servers that are serving the POP3 client protocol